Pre-Built Model Tutorial
Welcome to the ProformaFC Pre-Built Model tutorial, your step-by-step guide to efficiently input, organize and analyze the key project data for your financial model. This comprehensive walkthrough will guide you through the steps to input your project’s essential information.
The walkthrough will start with the inputting of high-level project information such as the capitalization stack, debt assumptions, project schedule, and high-level project details on the Dashboard and will then progress through the rest of the inputs step-by-step.
To the right you can see the overall print area of the Pre-Built Model’s Dashboard. We will highlight each step taken below on the model, so that you can easily follow along. Let's get started!
Step 1: Set Up Your Spreadsheet
Open your spreadsheet software (e.g., Microsoft Excel) to begin populating your Proforma Dashboard.
Begin by clearing out the hard coded input information in your model from any previous projects. Once all previous inputs have been set to zero, you can begin populating your model on the Dashboard.
The first step of populating any model should begin in the upper right hand corner of the Dashboard, with the client’s name, project’s name, address, city, state and property size as shown to the left.
You can also include any known variables like sales commissions, closing cost expenses, tax rates, etc. below the General input box.
***In all of ProformaFC’s Pre-Built Models, all inputs used to populate the model by the user are colored light blue, with dark blue font. All other cells are used to calculate the model and should not be changed without first checking the cell’s equations.
Step 2: Set up Your Project Schedule
The next step in populating your project will be setting your Project Schedule. You’ll start by changing the Property Acquisition Start Date to your project’s start date using the MM/DD/YYYY convention.
To determine the length of each successive period for the project, input the number of months for each phase under the “Months” header to the right of the project start date. The Lease-Up period will be populated based on your lease-up timing.
If you have any other high-level project inputs such as the intended Sales Cap Rate, Sales Commission and Closing Costs or Capital Expenditure set-aside’s, they can be input directly above the Project Schedule
Step 3: Set up Your Budget
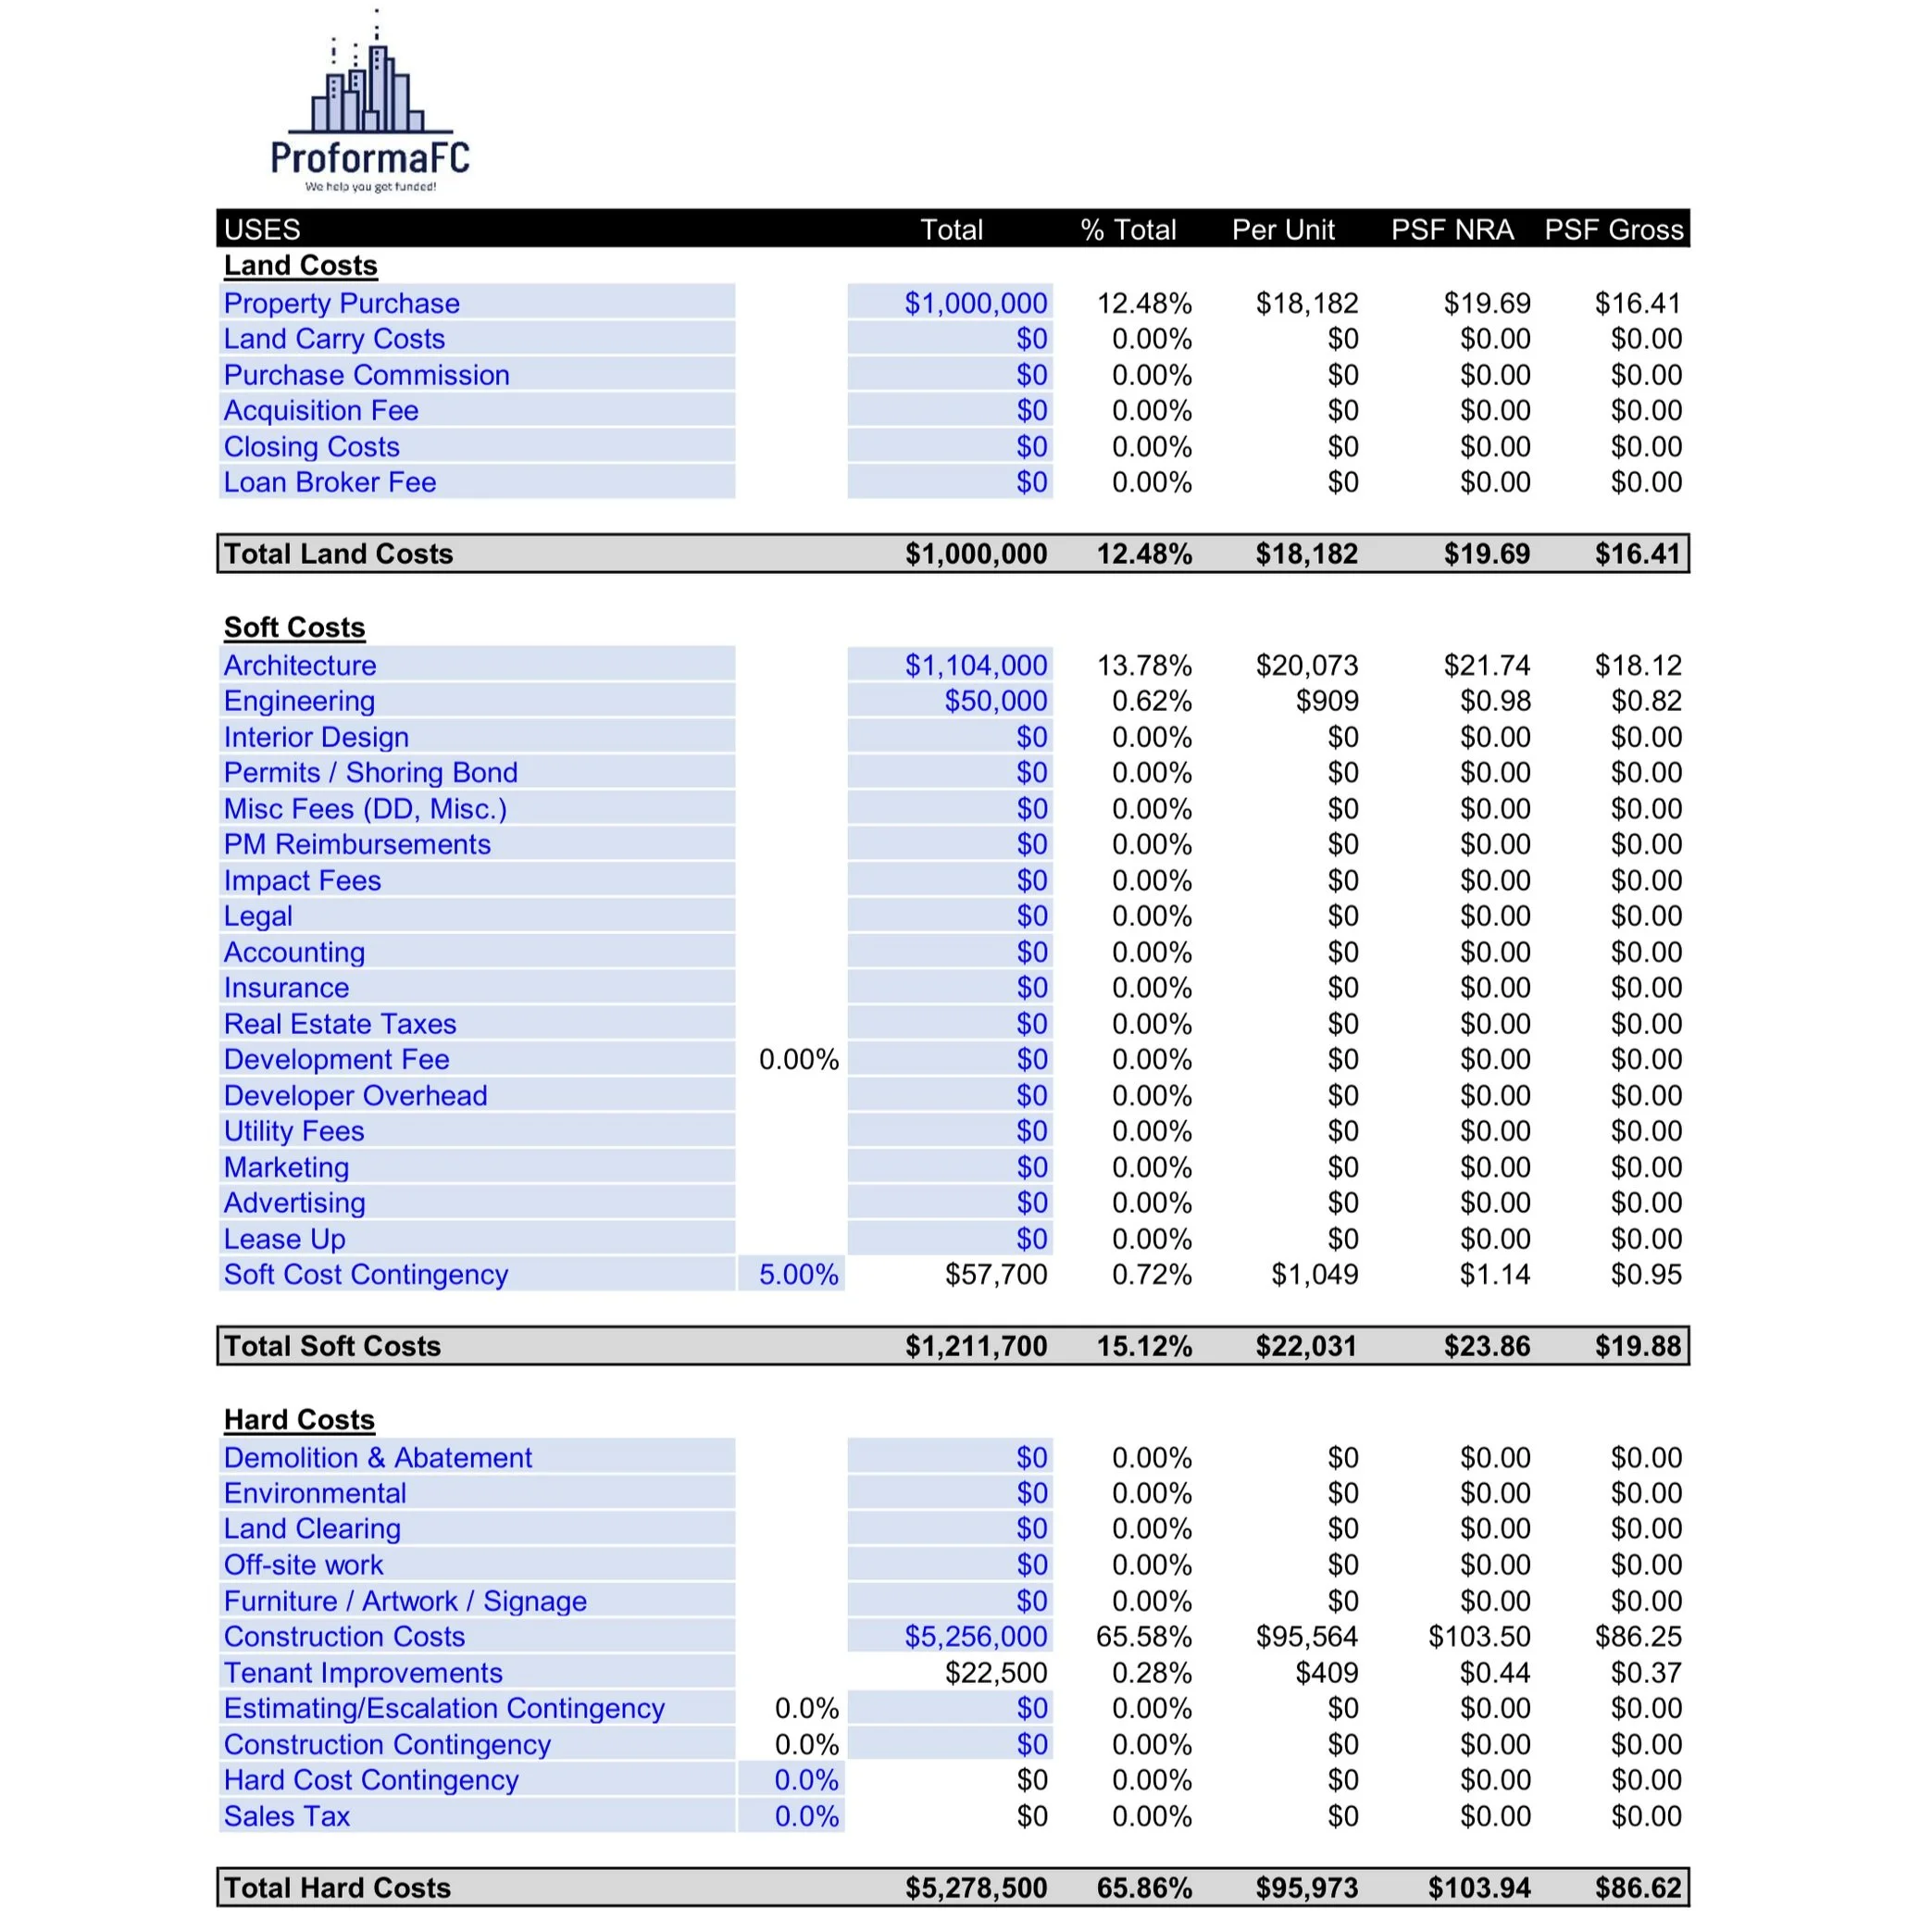
The next step of your model’s population will be to input your project’s budget.
As in all other areas of the model, the light blue highlighted cells are the inputs for the budget. Both the line item titles as well as the budget amounts can be changed here, as noted by their coloring.
Most of the budget line items will be input as total dollar amounts in the column headed “Total”. These amounts will then be calculated to the right of the input column as the % of total invested, $ per unit, $ per square foot of net usable area, $ per square foot of gross buildable area.
Some specific items like the contingencies and equity sourcing fees are input as percentages of their respective line items. As an example, the equity sourcing fee is based on a percent of the total LP equity invested in the project.
The interest reserve included in the Financing Costs section of the budget is calculated for you by the sheet. Once the budget has been input and the debt underwriting has been set, the model should be recalculated using the “Recalculate Project” button.
Step 4: Set up Your Rent Roll
The next step will be to populate your project’s rent roll or unit distribution. Depending on what asset classes are included in your specific project, you can jump to the respective step below to see instructions for its input walkthrough.
Step 4.1 - Multifamily
Step 4.2 - Commercial
Step 4.3 - Residential
Step 4.4 - Hospitality
Step 4.1: Set up Your Multifamily Rent Roll
If your project contains a Multifamily component (residential for lease), than your Rent Roll input section will look like the section to the left.
To begin inputting your project’s Rent Roll, start by determining how many different unit types and sub-types you have. Unit types will be included in the upper left most cell of each unit section, while sub-types will be included below those headers. Examples of unit types would 2Br/2Ba and 3Br/2Ba units, while unit sub-types would describe the differences between sizes, views, placement within the property, balconies, etc.
Once you have the unit sub-types input, you can input the number of each sub-type under the “Units” header. The average unit square footage for each sub-type can be input under the “Avg. SF” header. The monthly rental rate for each sub-type can then be input under the “$/Unit/Mo.” header. The expected annual rental growth rate can be input in the column furthest to the right.
Once your entire rent roll has been input, you will be able to see your project’s net cash flows from the unit rentals calculated at the top of the rent roll.
The multifamily lease-up input section will be located on the same Rent Roll tab and will be explained further below.
Step 4.2: Set up Your Commercial Rent Roll
If your project contains a Commercial component (office, retail, general commercial), then your Rent Roll input section will look like the upper portion of the section below.
To begin inputting your project’s Rent Roll, start by inputting the commercial tenant names or types. Once you have included the tenant title information in the first column, you will set their tenancy to “Active” or “Inactive” in the next column labeled “Tenancy”, and can select the type of commercial use in the adjacent column to the right titled “Unit Type”. Under the header “Unit Name” you should include the unit’s wayfinding location within the property (unit 1000, 1010, 1020, etc.).
The number of units of a specified type can be input under the “Units” header, with the allocatable square footage per space included under the “Avg. SF” header to the right. Once these have both been input, the Total SF will be calculated in the column to the right of the Avg. SF inputs. Your lease type per unit can be included under the “Type” header, with the selections including NNN, FSG and MG. If MG is selected, the adjusted amount paid by the owner must be input in the MG Adj. column to the right.
Tenant improvements can be added as a $/SF amount in the column labeled “TI $/SF”. Each unit’s annual lease growth rate can be input under the “Growth %” header.
Step 4.3: Set up Your Residential Unit Roll
If your project contains a Residential for sale component (condos, townhomes, tract development), then your Rent Roll input section will look like the lower portion of the section below.
To begin inputting your project’s Rent Roll, start by inputting the Residential unit title or type in the left most column. In the three columns immediately to the right of the first, you can input the unit types bedroom and bathroom count as well as what type of residential unit it is.
Under the header “Units” you can include the total number of units per type, while under “Avg. SF” you can input the unit square footage per type. The column immediately to the right will then show the total square footage for all units of that type within the project. In the “$/SF” column, you’ll be able to include your unit’s $/SF sales rate used to calculate it’s total sales value in the right most column.
Step 4.4: Set up Your Hospitality Income and Occupancy
If your project contains a Hospitality component (hotel, motel, AirBNB, VRBO, etc.), than your Hospitality income input section will look like the section to the right.
To begin populating your project’s hospitality income, you’ll need to include the total number of rooms as well as they’re square footage in the top left.
Next, you’ll include the annual average daily rate (ADR) per year, as well as any ancillary income projections from things like Food & Beverage sales as well as miscellaneous income sources. These are input as a $/Occupied Room rate.
The monthly occupancy can be set for the first three years of operations below the income inputs. The third years operations are assumed to be the stabilized operations that will carry forward throughout the rest of the cash flow model.
Once your ADR and occupancy rates are included, the model will calculate your Revenue Per Available Room (RevPAR).
Step 4.4.1: Set up Your Hospitality Expenses
If your project contains a Hospitality component (hotel, motel, AirBNB, VRBO, etc.), then your Hospitality expense input section will look like the section below.
To begin populating your project’s hospitality expenses, you’ll need to go input the average dollar cost per occupied room for each line item per year for the whole duration of the project’s hold period.
While all other expense items can only be input on a dollar per occupied room basis, the hospitality portion of the project’s replacement reserves are input on a % of effective gross hospitality income per period basis.
Step 5: Set up Your Project’s Lease-Up Timing
Once you have your project’s rent/unit rolls populated, you’ll need to set up their lease-up or sales schedules (except for Hospitality, which is done on the income/expense tab) on the Rent Roll tab as shown below.
The residential lease-up assumptions box consists of two inputs; a percent number of units that are assumed to be preleased so that they will become fully occupied at the completion of construction, and a percent input for the number of units to be leased up each month after the completion of construction.
The residential for sale scheduler allows for the input of a starting period for sales (this can be set prior to the end of construction), the number of presold units that will close in the starting period, the number of units sold per period and the frequency of periods. (this can be set so that units only sell every 2nd, 3rd, 4th month, etc.)
The commercial lease scheduler includes the timing inputs for each spaces tenant improvements under the “#” header, with TI start dates input in the next column. The lease duration for each space can be input under the “Lease Months” header. If the Lease Start date is highlighted in red, it means that the lease is starting prior to the end of construction, indicating you should check your schedule and be sure that will be allowed for your project.
Step 6: Set up Your Project’s Construction Draw Schedule
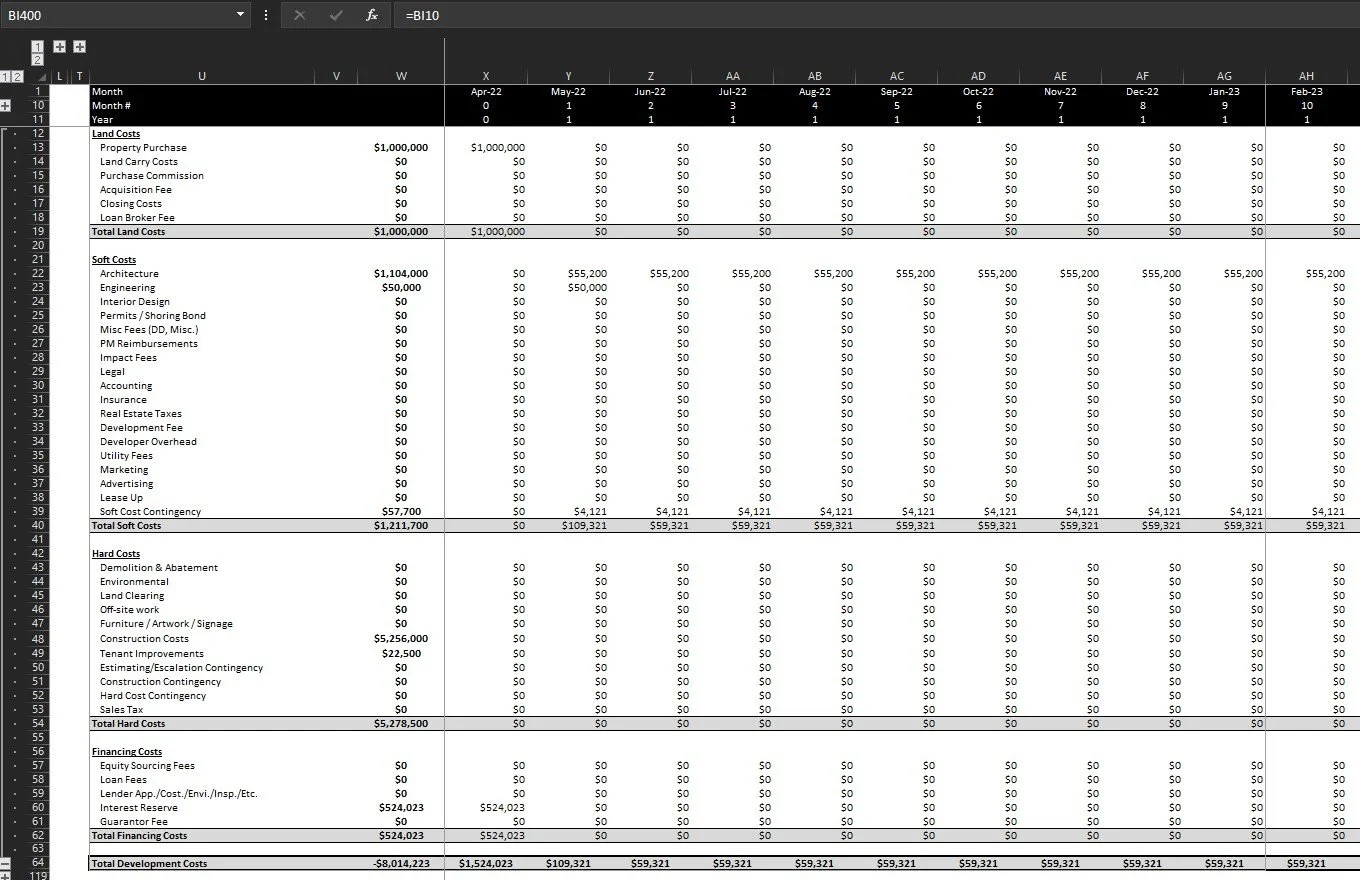
Once you have the project’s rent roll and lease-up timing completed, you’ll need to set-up your Construction Draw Schedule on the Sources & Uses | Monthly CF tab using the instructions below.
As shown to the left, there are “+” and “-” symbols in the side and top bars of the excel model. To modify the project’s construction draw schedules, you’ll need to click the two “+” symbols in the top bar.
This will expand the hidden scheduling input areas shown below for the construction draw schedule timing input boxes.
***There are additional “+” and “-” symbols on the side and top bar. These are used for grouping of sections within the tab to allow for the hiding away of asset classes not currently included in the project if a mixed use model is being used.
Step 6.1: Set up Your Project’s Construction Draw Schedule
Once you have clicked the “+” symbols in the top bar, the section to the left will expand, revealing the Construction Draw Scheduler.
In this section, you can set the Cost Distribution Format to decide how a cost gets allocated over its selected disbursal period (Straight line, Bell Curve, Fixed Month, Hard Coded, etc.). If “Fixed Month” is selected, the cell to the right of the selection in Column E will turn blue and allow you to select a month from the drop-down menu.
You can also allocate a certain percentage of the cost to a specified phase of construction (Acquisition, Design & Entitlements or Construction), so that the remaining portion of the cost can be allocated to a secondary phase grouped in the second “+” to the right in the top row.
All costs must be allocated to a specific phase with a Cost Distribution Format for them to be properly calculated within the model. If any phase is set to zero months, the Cost Distribution Format must be set to a month specific input (First Month, Last Month or Fixed Month).
Step 7: Set up Your Project’s Debt Undwriting
Once all of your project’s basic information is populated (project schedule, unit information, budget, draw schedule), you can set your project’s debt underwriting on the Dashboard.
The debt inputs are broken out into three sections for Mezzanine, Construction and Permanent debt. Each of the boxes calculates the maximum loan that can be underwritten based on four primary underwriting metrics; Loan-to-Value (LTV), Loan-to-Cost (LTC), Debt Service Coverage Ratio (DSCR) and Debt Yield (DY).
You can input the Concluded Loan amount for each loan selected below the Maximum Underwritten Loan line in each box. The rates, coverage ratios and LTV and LTC percentages can all be adjusted to modify the maximum underwritten loan.
Each loan can also be turned on/off in the input box shown below, directly above the capital stack in the project’s Capitalization input box.
If your model doesn’t include residential sales, then the concluded Permanent loan will need to be sufficiently large to pay back both the Mezzanine and Construction loans.
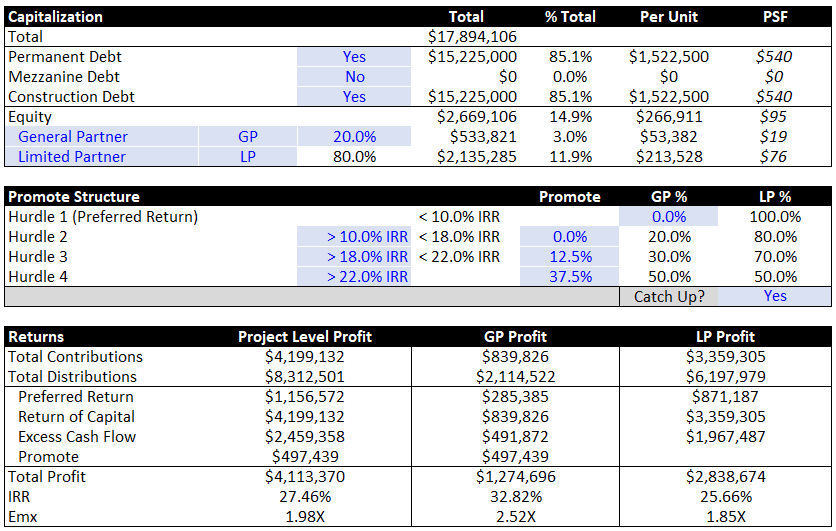
Step 8: Set up Your Project’s Capitalization
Once your debt has been included in the model, the total required equity will be calculated as the remainder of the total project cost less the total mezzanine and construction debt included in the project.
The total required equity will then be allocated to the General Partner (GP) and Limited Partner (LP) according to the percentages populated in the cell to the right of the partner initials. Only the GP position is set, with the LP position being the remainder of the equity less the GP position.
Once your project’s capitalization has been included in the model, you can move on to setting up your waterfall with a preferred return, promote and General Partner catch up provision.
***The project and partner level returns are automatically calculated below the promote structure as you update the model.
Step 9: Set up Your Waterfall (Preferred Returns and Promotes)
Now that your project’s debt underwriting and capitalization have been filled in, you can move on to filling in the waterfall.
The waterfall is built out in a three-tier IRR-hurdle based format. Each IRR hurdle can be input in the column immediately to the right of the list of hurdles, with the last hurdle being the remaining stratification for all remaining cash flows.
The first hurdle, known as the Preferred Return (Pref), can be allocated fully to the LP or can be split between the LP and GP according to any specified deal terms.
The promote can be included for the GP per hurdle. The amount input into each promote hurdle will re-allocate that percent of the LP’s position to the GP until the hurdle rate is met.
If the GP is excluded from the Preferred Return above, then the Catch Up can be set to “Yes”, which will allow the GP to be caught up to the LP’s Pref once the LP has been fully compensated at the end of the first hurdle, but prior to the start of the second hurdle.
Step 10: Run the Calculation Macro
Once you’ve completed the initial build out of your model, you’ll need to click on the large blue “Calculate” button in order to run the recalculation macro. This macro allows your model to update the interest reserve calculations for the mezzanine and construction loans to update the relevant amounts in the project budget.
This process will need to be repeated any time inputs have been changed in the model that will affect the construction or mezzanine loans.
Step 11: Refine and Review Your Model
Once you’ve completed the initial build out of your model, you can review the project’s assumptions and returns to help you further refine the project’s performance if required. If the project performs well from the first iteration, you can begin sharing out PDF copies of the Memo tab (shown to the right) with potential lenders and investors to gauge their interest in the project.
The Memo tab is your high-level project overview that allows you to provide a snapshot of the project’s general information including unit info, project schedule and sources & uses, along with a brief annualized cash flow analysis and partner level returns analysis. There are no inputs on this tab, so any adjustment required on this tab, need to be made utilizing the previously described steps depending on which portion of the model you’re seeking to adjust.
**ProformaFC also provides hourly model population and revision services for our clients should they prefer to have the model built out and populated for them.
-
ProformaFC is happy to help any client populate a model that they’ve purchased. If you’d like to discuss your project’s inputs and assumptions to better understand how long population of your model will take and how much it will cost, feel free to reach out today via phone or email.
-
All of ProformaFC’s models are sold unlocked for our clients, so that you can make any adjustments, revisions or changes you would like to easily and without having to unlock any portion of the model. Additionally, ProformaFC offers hourly revisions and modification services for purchased models.
-
No worries! Just provide us with a copy of your receipt from the original purchase and we’ll be happy to provide you with a fresh copy of the original model you purchased, free of charge.


